8 Steps to a Pain-Free Back
Earlier this week I had a client ask me, “What’s the best chair for my back?” This wasn’t the first time I have been asked this question and my answer is always one that is met with surprise. That’s because there isn’t a chair I recommend as I wish all of my clients would use a simple, firm, but wobbly stool, rather than a super expensive ergonomically designed chair. Yes, you read that right! Sitting a wobbly stool, like the one I have in the office, or using a stability disc and keeping your feet flat on the floor, helps promote a great posture when sitting.
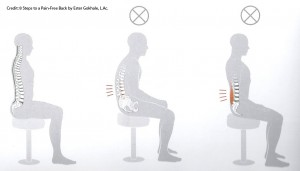
Ultimately, It’s not about what you sit on, as much as how you sit and the best book for detailing this is 8 Steps to a Pain-Free Back by Ester Gokhale, L.Ac.. In this groundbreaking book, Gokhale describes 14 steps to adjusting your seated posture. The steps help you position your pelvis to become the foundation of your spine, because when your pelvis is well positioned, your upper body is upright and relaxed. Take a look at the middle and right hand side figures in the picture, you’ll notice that although their upper body is relaxed, their pelvises are poorly positioned and are slumped (middle illustration) or upright but tense (right side).
By sitting on the front half of wobbly stool or a stability disc or yoga ball and having your feet on the floor flat, you body becomes relaxed, the exact position Gokhale achieves in her book. When your pelvis is well positioned, your vertebrae stacks, with minimal muscle tension.
Find out what's happening in San Rafaelwith free, real-time updates from Patch.
For those that don’t have a wobbly chair and stability ball for sitting, there is a way to achieve the same results using a firm chair and a rolled up towel.
Let’s review the 8 steps in the book for adjusting your seated posture to help you get to a pain-free back.
Step 1: Place a wedge on a chair. Your wedge can be a rolled up towel that you place on the back part of the chair to help you tip your pelvis forward when you sit.
Find out what's happening in San Rafaelwith free, real-time updates from Patch.
Step 2: Stand with your back to the chair and with your feet hip-width apart.
Step 3: Position your feet in a kidney bean shape. Place slightly more weight on the outer edge of the foot. By doing this you will align your feet and legs in the optimal position. If you have difficulty, don’t worry, you can skip this step and come back to it later.
Step 4: Bend at the hips. As you lower yourself onto the front of the edge of the wedge, bend at your hips and then at your knees. By doing this, you will have successfully tipped your pelvis forward and have it positioned between your legs.
Step 5: Anchor your rib cage down. This next step takes some practice but is very important! Don’t give up here. Contract your upper abdominals to pull the front of your rib cage downwards and inwards. Imagine you are slightly hunching the center of your back around the kidney area, without rounding the upper back and rounding your shoulder forward. When you do this, your lower back lengthens and becomes straight and it eliminates any pressure on the lower back caused by the pelvis being tipped forward.
Step 6: Hinge. Move your hips only to return to an upright position. Be sure to leave your pelvis tipped forward and your ribcage anchored.
Step 7: Shoulders back. One shoulder at a time, roll them back. Be sure to not let your rib cage move with your shoulders causing your lower back to sway. If you turn your palms face up and rest them on your thighs and then draw your elbows back about 3 inches you will retract your shoulder blades without loosing the rib anchor.
Step 8: Lengthen your Neck and Relax. Completely relax your body and make sure you have a combination of a tipped pelvis and a relatively straight back. Look in a mirror to make sure. If you have, skip to step 14.
Trouble shooting:
Step 10: Severely tipped pelvis. Overtipping forces an arch in your lower back and can be corrected by shifting your weight to the left and lifting your right buttock, then repositioning the right sitz bones slightly forward and repeating the same on the opposite side.
Step 11: Swaying? Resist the tendency to sway, If you find that you are swaying, go back to step 5, and concentrate on using your abdominal muscles, especially your internal obliques.
Step 12: Slumping? If you are slumping, try to tip your pelvis further forward.
How will I know if I am doing this right?
There will be few indications that you are sitting in the correct position.
- You will be able to sit with ease for longer periods of time and be comfortable sitting
- Your breathing patterns will improve by having increased lung capacity and promoting good circulation
For about $35 you can have the best ergonomic chair possible. I encourage you to check out the 8 Steps to a Pain-Free Backbook online, sit with our copy after your next adjustment, or ask me to review how you sit for personal pointers to help you achieve a pain-free back. I also have Stability Discs for sale.
This article originally was posted on the Thriving Life Wellness Center blog.